Clash is a rule-based proxy client written in Go. Instead of pushing every connection through one tunnel, it reads a config file and decides per request where traffic should go - this domain direct, that domain through a US proxy, this application through a rotating pool.
That makes it useful well beyond simple proxying. With Clash you can route only your scraper's traffic through Webshare while the rest of your machine stays on your normal connection, split traffic across several country-specific endpoints, or push an entire lab of test devices through residential IPs from a single router.
One thing to be clear about up front: Clash is not a proxy provider. It is a client. It has no IP addresses of its own - you supply the upstream credentials. This guide uses Webshare proxies as those upstreams.
Which Clash client should you use?
The original Clash core (Dreamacro/clash) and Clash for Windows are both archived and no longer maintained. Everything current runs on Clash Meta, also called mihomo. The clients below are GUI wrappers around that same core, and they all read the same config.yaml format - so every configuration in this guide works across all of them.
Still using Clash for Windows?
Clash for Windows was the most popular client for years, and a lot of guides still describe its interface - the General tab, the Profiles list, the floppy-disk save icon. It has not received updates since the project was pulled, which means no protocol support for anything released since, no security patches, and no fixes for the DNS handling issues in later builds.
Migrating is straightforward, because the config format did not change. Your existing config.yaml works as-is:
- Install Clash Verge Rev.
- Open Profiles → New, and paste in your existing config, or import the same subscription URL.
- Confirm the core is set to Mihomo (Clash Meta) in Settings.
- Delete the old client.
Everything in this guide applies to Clash for Windows configs too - the proxies, proxy-groups, and rules blocks are identical. You just get a maintained client to run them on.
What you need before you start
- A Webshare account. Start with 10 free proxies if you do not have one - no card required.
- Your proxy credentials. Username, password, and either the backbone hostname or a list of individual proxy IPs.
- A Clash client installed from the list above.
Step 1: Get your Webshare credentials
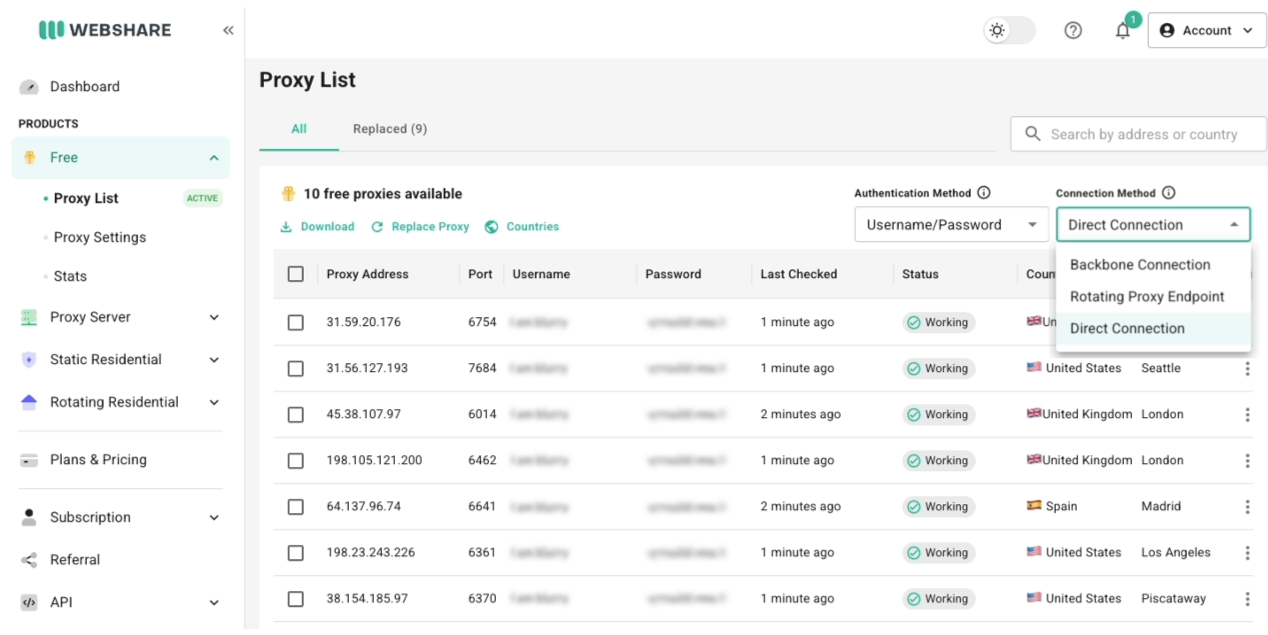
Log in to your Webshare dashboard and open the Proxy List page. Two connection methods matter here:
- Backbone / Rotating Proxy Endpoint - one hostname,
p.webshare.io, that fronts your whole pool. Simplest setup and what most people should use. Default port is80, with1080,3128, and a range of high ports also available. - Direct Connection - a list of individual proxy IPs, each with its own port. Useful when you want each proxy to appear as a separate, manually selectable node in Clash.
Copy your username and password from the Proxy Authentication section.
Step 2: Understand the Clash config structure
Every Clash config is built from three layers. Once these click, the rest is detail.
 proxies:        →  WHAT your nodes are      (the actual servers)
 proxy-groups:   →  WHICH node gets used     (selection logic)
 rules:          →  WHAT TRAFFIC goes where  (routing decisions)
A request enters Clash, gets matched against rules top to bottom, the first match sends it to a proxy-group, and the group picks a node from proxies. That is the whole model.
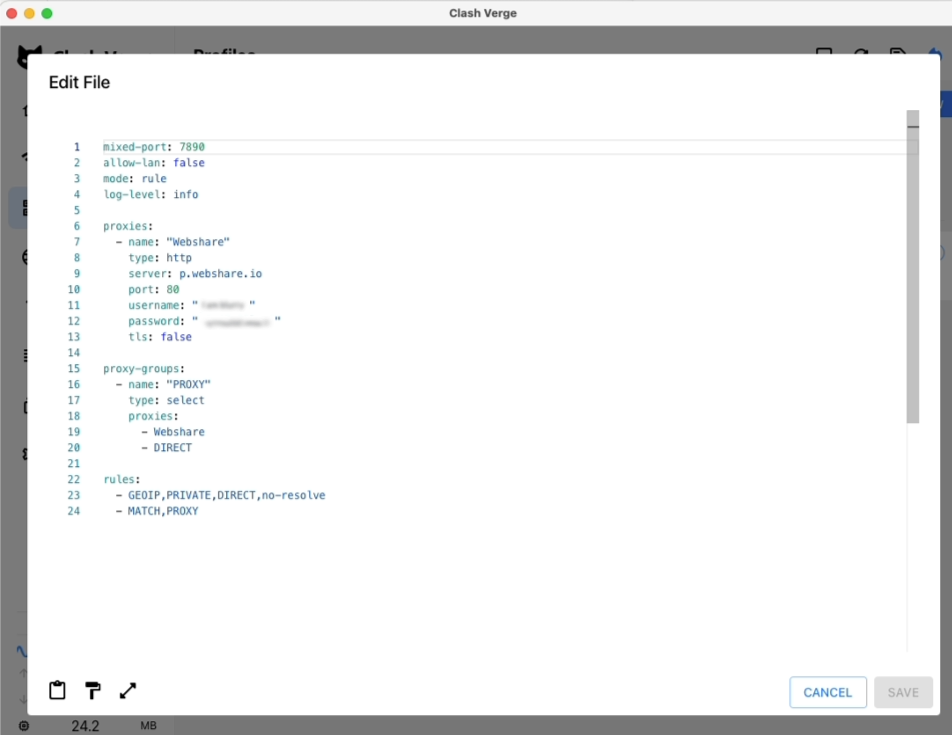
Here is the smallest working config using a Webshare backbone endpoint:
yaml
mixed-port: 7890
allow-lan: false
mode: rule
log-level: info

proxies:
  - name: "Webshare"
    type: http
    server: p.webshare.io
    port: 80
    username: "YOUR_USERNAME"
    password: "YOUR_PASSWORD"
    tls: false

proxy-groups:
  - name: "PROXY"
    type: select
    proxies:
      - Webshare
      - DIRECT

rules:
  - GEOIP,PRIVATE,DIRECT,no-resolve
  - MATCH,PROXY
What each general setting does:
mixed-port: 7890- opens one local port that accepts both HTTP and SOCKS5 client connections. Point your browser or script at127.0.0.1:7890and it works either way. (Older configs use separateportandsocks-port;mixed-portreplaces both.)allow-lan: false- only this machine can use the proxy. Set totrueif you want other devices on your network to route through it.mode: rule- use therulessection. The alternatives areglobal(everything through the selected node) anddirect(bypass everything).GEOIP,PRIVATE,DIRECT,no-resolve- keeps local network traffic off the proxy. Always keep this as your first rule.
Step 3: Add your Webshare node
Option A - Backbone endpoint (recommended)
Use this when you want Webshare to handle IP selection for you. A single node entry covers your whole pool.
yaml
proxies:
  - name: "Webshare"
    type: http
    server: p.webshare.io
    port: 80
    username: "YOUR_USERNAME"
    password: "YOUR_PASSWORD"
Option B - SOCKS5
If you prefer SOCKS5, change the type and use the SOCKS5 port shown in your dashboard:
yaml
proxies:
  - name: "Webshare-SOCKS"
    type: socks5
    server: p.webshare.io
    port: 1080
    username: "YOUR_USERNAME"
    password: "YOUR_PASSWORD"
Option C - Direct connection (individual IPs)
Each proxy in your list becomes its own node. This gives you manual, per-IP control inside the Clash UI:
yaml
proxies:
  - name: "WS-01"
    type: http
    server: 198.51.100.10
    port: 8080
    username: "YOUR_USERNAME"
    password: "YOUR_PASSWORD"

  - name: "WS-02"
    type: http
    server: 198.51.100.11
    port: 8080
    username: "YOUR_USERNAME"
    password: "YOUR_PASSWORD"
Tip: Do not hand-copy a hundred proxies. Pull the list from the Webshare Proxy List API and generate the YAML block with a short script. If you would rather have Clash fetch and refresh the list on its own, see the proxy-providers section further down.
Step 4: Control rotation, country, and sessions
Webshare encodes targeting options in the username, separated by hyphens:
{username}-{country_code}-{geo_params}-{session_id}That means you can create several Clash nodes that all point at the same hostname but behave completely differently - just by varying the username:
yaml
proxies:
  # New IP on every single request
  - name: "WS-Rotate"
    type: http
    server: p.webshare.io
    port: 80
    username: "YOUR_USERNAME-rotate"
    password: "YOUR_PASSWORD"

  # United States exit, rotating
  - name: "WS-US"
    type: http
    server: p.webshare.io
    port: 80
    username: "YOUR_USERNAME-us-rotate"
    password: "YOUR_PASSWORD"

  # Germany, sticky - same IP held across requests
  - name: "WS-DE-Sticky"
    type: http
    server: p.webshare.io
    port: 80
    username: "YOUR_USERNAME-de-4471"
    password: "YOUR_PASSWORD"

  # City-level targeting (residential plans)
  - name: "WS-LA"
    type: http
    server: p.webshare.io
    port: 80
    username: "YOUR_USERNAME-us-city_los_angeles-rotate"
    password: "YOUR_PASSWORD"
Rotating vs. sticky, in one line each:
- Rotating (
-rotate) - a different IP per request. Use for scraping, price monitoring, SERP collection. - Sticky (
-1234, any number you choose) - the same IP is reused for that session ID. Use for logins, carts, multi-account work, anything with a session that breaks if the IP changes mid-flow.
City targeting is available on residential plans. Country targeting works across plans that include multiple countries.
Step 5: Build proxy groups
Groups decide which node handles a request. Four types cover almost everything:
yaml
proxy-groups:
  # Manual switch - you pick from the UI
  - name: "PROXY"
    type: select
    proxies:
      - AUTO
      - WS-US
      - WS-DE-Sticky
      - DIRECT

  # Picks the lowest-latency node automatically, re-tests every 5 min
  - name: "AUTO"
    type: url-test
    proxies:
      - WS-US
      - WS-DE-Sticky
    url: "http://www.gstatic.com/generate_204"
    interval: 300
    tolerance: 50

  # Uses the first node that is actually reachable, in listed order
  - name: "FALLBACK"
    type: fallback
    proxies:
      - WS-US
      - WS-DE-Sticky
    url: "http://www.gstatic.com/generate_204"
    interval: 300

  # Spreads connections across nodes; same domain sticks to one node
  - name: "BALANCE"
    type: load-balance
    strategy: consistent-hashing
    proxies:
      - WS-01
      - WS-02
      - WS-03
    url: "http://www.gstatic.com/generate_204"
    interval: 300
load-balance with consistent-hashing is the one worth knowing about: requests to the same domain keep landing on the same node, which preserves session consistency while still distributing load across your pool.
Step 6: Write routing rules
Rules are evaluated top to bottom, and the first match wins. Order matters more than anything else here.
yaml
rules:
  # Always keep local traffic off the proxy
  - GEOIP,PRIVATE,DIRECT,no-resolve
  - IP-CIDR,127.0.0.0/8,DIRECT,no-resolve

  # Send specific targets through specific countries
  - DOMAIN-SUFFIX,amazon.com,WS-US
  - DOMAIN-SUFFIX,amazon.de,WS-DE-Sticky

  # Route one application's traffic only
  - PROCESS-NAME,python,PROXY
  - PROCESS-NAME,scrapy,PROXY

  # Everything else goes direct
  - MATCH,DIRECT
The rule types you will actually use:
That MATCH line at the bottom is your default. Setting it to DIRECT means only traffic you explicitly named goes through Webshare - usually what you want when Clash is running on your daily-driver machine. Setting it to a proxy group means everything is proxied except what you explicitly excluded.
The mistake that catches almost everyone: you may only have one MATCH rule in the entire list. Rules are evaluated in order and MATCH catches everything, so the first one ends evaluation - any rule below it, including a second MATCH, is silently ignored. No error, no warning, just traffic going somewhere you did not intend. If you add a new group and want it to be the default, replace the existing MATCH line rather than adding another one.
PROCESS-NAME is the rule that makes Clash genuinely worth using over a plain proxy setting. It lets you send your scraper through residential IPs while your browser, Slack, and package manager stay on the local connection.
Step 7: System proxy vs. TUN mode
Clash gives you two ways to actually capture traffic.
System proxy mode sets your OS-level HTTP/SOCKS proxy to point at Clash's local port. It is simple and reversible, but applications that ignore system proxy settings - quite a few CLI tools and games - will bypass it entirely.
TUN mode creates a virtual network adapter and captures everything at the network layer, including traffic from applications that ignore proxy settings. It needs administrator privileges to install the adapter.
yaml
tun:
  enable: true
  stack: mixed
  auto-route: true
  auto-detect-interface: true
  dns-hijack:
    - any:53
Use system proxy mode for browser and script work. Switch to TUN when something refuses to route.
Step 8: Verify your exit IP
Do not trust the UI - check the actual egress.
Through the Clash local port:
curl -x http://127.0.0.1:7890 https://ipv4.webshare.io/
With system proxy or TUN enabled:
curl https://ipv4.webshare.io/You should see a Webshare IP, not your own. If you configured a country-targeted node, confirm the geolocation matches.
To confirm rotation is working, run the request several times against a node using -rotate in the username. The IP should change on each call:
for i in {1..5}; do curl -s -x http://127.0.0.1:7890 https://ipv4.webshare.io/; echo; done
Which proxy type should you use with Clash?
Clash treats every upstream the same way - an http or socks5 node with credentials. What changes is how the destination site reacts to the IP behind it. Match the type to the job:
A practical setup uses more than one at once. Define an ISP node for the sites where you hold a session, a rotating residential node for collection work, and route between them with DOMAIN-SUFFIX rules - Clash handles the switching, so you are not maintaining separate environments.
On protocols: HTTP is fine for ordinary web traffic. Use SOCKS5 when you need UDP support or when a tool handles SOCKS more reliably than HTTP CONNECT.
Advanced: let Clash fetch your proxy list automatically
If you run a large Webshare pool, hardcoding nodes gets unmanageable. proxy-providers lets Clash pull a node list from a URL and refresh it on a schedule:
yaml
proxy-providers:
  webshare:
    type: http
    url: "https://your-host.example.com/webshare-nodes.yaml"
    path: ./providers/webshare.yaml
    interval: 3600
    health-check:
      enable: true
      url: "http://www.gstatic.com/generate_204"
      interval: 300

proxy-groups:
  - name: "POOL"
    type: load-balance
    strategy: consistent-hashing
    use:
      - webshare
The file at that URL needs to be a YAML document containing a proxies: list in the same format shown earlier. Generate it from the Webshare Proxy List API on a cron job, host it somewhere your Clash instances can reach, and your node list stays current without anyone editing a config by hand.
Next steps
You now have a working Clash setup with Webshare as the upstream, per-domain and per-application routing, and a way to verify what is actually going out.
If you do not have proxies yet, Webshare gives you 10 free proxies to test this configuration with - no card required. For higher volume or country- and city-level targeting, our residential plans cover 80 million+ IPs.