


Everyone at one point has seen or worn a product from the popular designer brand, Nike. While some buy these products from third-party retailers, the best option would be to order them directly from the official store.
Despite the brand’s popularity, its website is unavailable to users in some regions. To get past this restriction, the best option is to use a proxy (for a supported country) on your browser or device. Our recommended option to get these proxies is Webshare and in the following sections, we’ll provide steps on how to use them.
Before Starting
It’s important to know how to get these proxies to bypass the restriction of visiting the Nike website. In this case, we’ll show you how to get them from Webshare.
Webshare is a popular and trusted proxy provider with a large global network with up to 30 million IPs from over 190 countries. Some of these locations include the USA, Germany, France, China, Japan, the United Kingdom, Australia, and Canada.
To get started, you need to sign up for an account with the platform, which will take less than five minutes to complete. You either register with your Google account or use the regular email and password option. Once you are done, click on the Sign Up With Email" button to access your account.
The platform offers newly registered users 10 free proxies from different locations. This bonus is completely free since you don’t have to purchase or even provide your credit card. You receive it immediately after signing up for an account.
After getting these proxies, you can use them to visit the Nike website. In the following sections, we’ll provide different methods on how to do so.
Easiest Method: Nike Proxy for Chrome
If you use Chrome browser, here is a simple guide to using Webshare proxies to visit the Nike website:
Step 1: Install Webshare Proxy Extension on Your Chrome Browser

After creating an account, head to our Chrome proxy extension page. Click on the "Add extension for free" button to add it to your browser. This link directs you to the Chrome webstore, where you can install the Webshare extension. Select the "Add to Chrome" button to get this add-on.
Step 2: Open the Webshare Extension
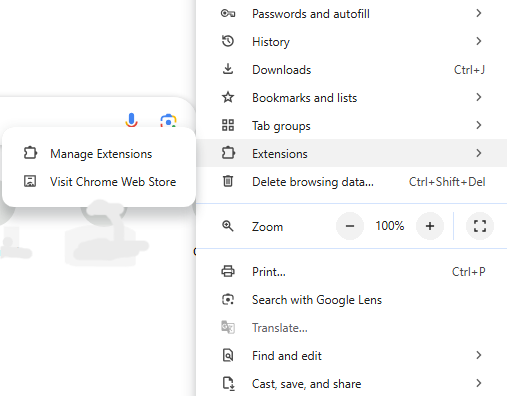
Once the installation is complete, head to the browser’s menu and scroll down, till you see the extension option. Hovering over it shows the “Manage Extensions” button. This brings up a mini page with the already installed extensions (including Webshare Proxy).
Step 3: Connect to Your Preferred Proxy
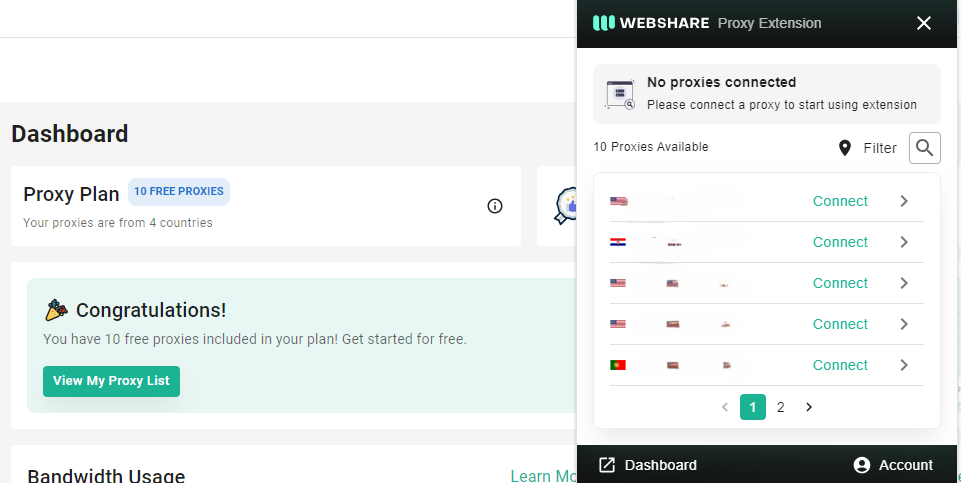
After opening the extension page, you'll find the Webshare Proxy, and clicking on it will open the extension. When you are logged in, you'll find 10 free proxies from different countries. If you want more info about each proxy, click on the arrow for each proxy and you'll get the proxy address, port, country, username, and password details.
With these free proxies, you can use any of them to visit the Nike website without any restriction. All you need to do is click on the "Connect" button.
How to Use Nike Website Proxy on Windows
For users using Windows PC, follow this simple step-by-step process:
Step 1: Head to the Proxy Setting on PC
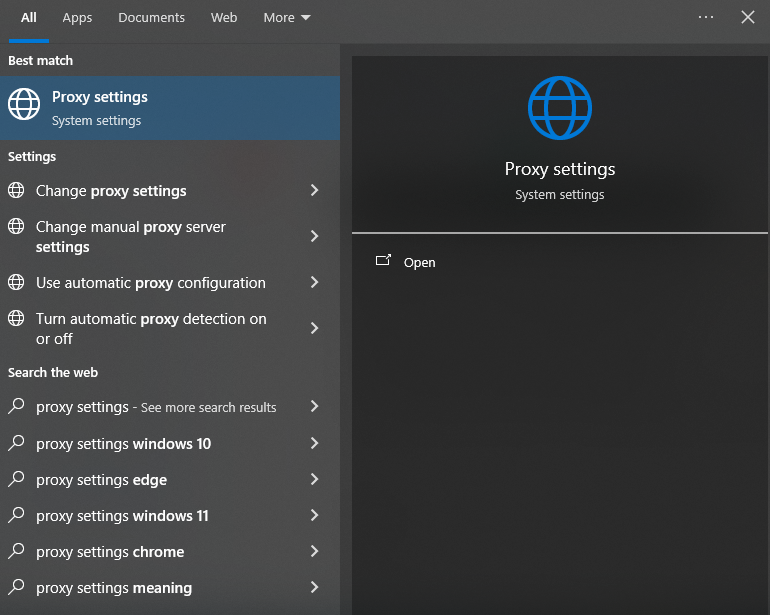
Search for "Proxy Settings" using the search on the left-bottom side of the screen. Click on open to view the page where you will enter your free proxies Webshare.
Step 2: Enter Your Free Webshare Proxy Details

On the proxy setting page, go to the "Manual Proxy Setup" section. Next, click on the "Use a proxy server" button to activate the option. Now, you need to get your preferred proxy information from the Webshare website.
Note that each proxy has different details like username, password, address, you can get them in your dashboard proxy list. On the manual proxy setup page, you'll see the boxes where you need to enter this information. Then, click on save to complete this step.
Nike Website Proxy for Android Instructions
Finally, this process is for users who prefer to use their Android devices. Make sure you follow the steps correctly.
Step 1: Connect Your Android Device to a WiFi
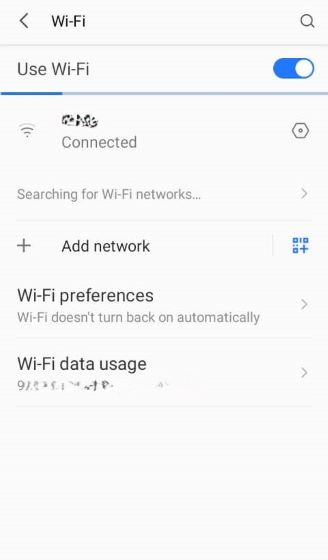
Before using a Webshare proxy, you need to first connect your Android device to a stable WiFi connection. After that, click on the setting option of the wifi you connected to and select "Advanced Settings."
Step 2: Enter the Proxy Details
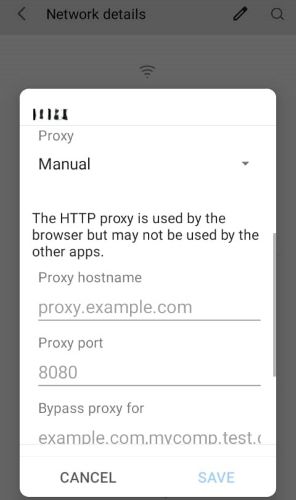
After clicking on "Advanced Settings," there will be a dropdown menu with three options, including Manual. Once you select it, it opens a section where you need to enter the address and port of any of your free Webshare proxies.
Step 3: Authenticate Your Proxy (Optional)
While it doesn't happen all the time, you may have to authenticate the proxy. There might be a random pop-up page, where you'll have to enter the username and password of the proxy you are using.
How to Test Nike Website Proxy?
There are two ways to test your Nike website proxy. The first is to visit the site and see if it actually works while the second is to use a third-party verification platform.
Just search for "What is my IP address?" on Google and you'll find the website among the results. Once you open the site, it should load up the details and location of the proxy you are using.
How to Turn Off Nike Website Proxy?
Depending on the option you use, there are different ways to turn off Nike Website proxy. These include:
- Chrome Extension: Click on the disconnect button in the Webshare extension to turn off the Nike Website Proxy.
- Windows: Toggle off the “Manual Proxy Setup.”
- Android: Either disconnect from that WiFi or clear up the proxy details in the manual section.
What is the Best Proxy to Use with Nike Website?
The best proxy to use with the Nike website is Webshare’s United States proxy, since Nike will offer the best selection for this region. You’ll find at least one of them among the free proxies you get from Webshare.


